Thursday, December 15, 2011

Rugelach


My sister gave me this recipe in 2006 (I know this because it's an email that I printed off). I've made it every year since. It's a favorite with my husband and son, and the girls like them too. They are not large, just 2 bites, but oh, so tasty. 

An easy cream cheese pastry is sprinkled with sugar, dried raisins and cranberries and cinnamon, then rolled up, brushed with egg, and sprinkled with sugar. I used gold sanding sugar this year because I found some in my cupboard, but white sugar works just fine.

Rugelach

Pastry:
2 cups flour
1/2 cup icing sugar
1 cup cold butter, cut into cubes
4 oz cold cream cheese, cut into cubes

1 egg, for brushing, whisked to combine yolk and white
sugar for sprinkling

Place flour and icing sugar in a food processor. Mix. Add the butter and cream cheese to the flour mixture and pulse until dough starts to come together. It may take awhile, but be patient, it will turn into a lovely cohesive ball in time. Form into three balls, then flatten each into a disc. Wrap separately in plastic wrap (or parchment paper). Chill until firm, at least 30 minutes. The dough can be made ahead, but let it come to room temperature (cool) for better handling.

Filling:
1/2 cup granulated sugar
2/3 cup dried sweetened cranberries
2/3 cup raisins
1 1/2 teaspoons cinnamon

Chop the raisins and cranberries together, then combine with the sugar and cinnamon in the food processor. Pulse until chopped a little more, and all the fruit is covered with cinnamon sugar.

On a lightly floured counter, roll each disc into a 12 inch (approximate) circle. Sprinkle with one third of the fruit and sugar mixture. Pat gently into dough. Cut into pie shaped wedges, 12-16 per circle. A pizza-cutter works well for this. Roll each wedge, beginning from the wide end. Place, point down, on a parchment covered baking sheet.

Brush with egg, sprinkle with sugar. Bake at 350 degrees for 13-16 minutes, or until golden. These freeze well. 

Saturday, November 26, 2011

Puffy Omelet with Sauteed Apples


Light and airy, this concoction is more like a souffle than an omelet. Combined with sauteed apples, a drizzle of maple syrup, and accompanied by toast and tea, it makes a fine Saturday morning breakfast. Sausages or bacon on the side wouldn't come amiss. Best of all, it can be whipped together from eggshell to plate in less than 25 minutes.

Puffy Omelet

4 eggs, separated
1/4 cup water
1/4 tsp salt
few grinds of freshly ground black pepper
1 Tablespoon butter

In mixing bowl, beat egg whites with the water and salt until stiff peaks form. In another bowl, beat the egg yolks and pepper until thick and lemon coloured. Fold into the egg whites.

Heat oven to 325 degrees. In a 10 inch skillet with an ovenproof handle, melt the butter over medium heat. Pour the omelet mixture into the skillet. Reduce heat to medium low, letting the omelet cook, without disturbing it, until puffy, about 5 minutes. Don't let the bottom burn.

Place in oven to finish cooking, 12 to 15 minutes. While the omelet bakes, prepare the apples.

Sauteed Apples

1-2 apples, quartered and cored (I like to leave the peel on, but that's up to you)
1 Tablespoon butter
2 Tablespoons brown sugar
2 Tablespoons water
2 Tablespoons maple syrup

Heat the butter in a skillet over medium heat. Add the apples and stir gently until they begin to slightly soften. Add the brown sugar, stir until all the apples are coated. Add the water and maple syrup. Let the mixture simmer gently until the apples are tender but still hold together.

To serve, slide the omelet onto a plate, score across the middle, spoon the apples on one side and flip the other side over top. Serve with a drizzle of maple syrup. 

Tuesday, November 22, 2011

Pear Cranberry Crisp


Warm, spicy, tart, sweet - this crisp has it all. I like a high topping to fruit ratio in my dessert and baking this in a shallow dish allowed for a good balance of crisp, sweet earthy crumbiness and soft, juicy fruitiness. What makes it special is the addition of candied ginger to the crumb mixture. 

This is a riff on the standard Betty Crocker apple crisp recipe that I've used for years. I don't think Betty would mind the liberties I've taken.

Pear Cranberry Crisp

2 - 4 large ripe pears, quartered, then cored and cubed (I left the peels on)
1/3 cup fresh cranberries (frozen are fine)

Place the fruit in a shallow baking dish, 8 x 8 inches, or equivalent. I should mention that in the above photo, I used only 2 pears because that's what I had, and because of the aforementioned desire for a high crumb to fruit ratio. Preheat the oven to 350 degrees.

Topping:

2/3 cup brown sugar (packed) 
1/4 cup all-purpose flour
1/4 cup whole wheat flour
1/2 cup oats
1-2 Tablespoons finely chopped candied ginger
3/4 teaspoon ground cinnamon
1/2 teaspoon freshly grated nutmeg (if you use pre-ground nutmeg, increase to 3/4 tsp)
1/3 cup butter, softened

Mix all of the above in a medium bowl, using your fingers to achieve a crumbly mixture. Sprinkle over the fruit. Bake 30 - 35 minutes until the pears are tender and the topping a rich golden brown. Serve warm. 

Try it with some softly whipped cream, lightly sweetened, with a touch of vanilla. I didn't, and the dessert was wonderful, but I can imagine it would only be improved with the cream. 


Thursday, October 27, 2011

Apple Pastry Squares


In the 1970s, Better Homes and Gardens published a series of cookbooks. In hardcover, the book titles included "Salads," "Cooking for Two," "Meals on a Budget," and "Homemade Cookies." My mother and my aunt had a lot of those books and I loved looking through them. When I married, I collected a few of my own, which I still have, including the last one listed, from which this recipe is taken.

I noted that I first made the recipe on April 9, 1980, and put a star beside it. I'd give it the same rating today, especially with the changes I've made. The pastry is flaky and crisp, the apple filling not too sweet, and the drizzled icing adds the last layer of flavor. Perfect with a cup of tea or coffee for dessert. Some like it with ice cream, I prefer it plain.

Regarding what kind of apples to use - I tend to use whatever is in the fridge. Granny Smiths are good and tart. Today I used a couple of small apples scavenged from an abandoned tree, plus some organic Honey Crisp apples from the store. 


Apple Pastry Squares


For the pastry:
2 1/2 cups all-purpose flour
1 cup butter, at room temperature
1/2 tsp salt
1 egg, separated
about 2/3 cup milk


In a food processor, combine the salt and flour. Cut the butter into chunks, place on top of the flour and pulse until fine crumbs form. Place the egg yolk in a measuring cup and add milk to make 3/4 cup. Whisk slightly, pour over the flour/butter mixture and pulse just until the dough comes together. Wrap in waxed paper and chill about 10 minutes.


Filling:
1 cup granola (or Corn Flakes)
4 medium apples, peeled, cored and sliced
2/3 cup granulated sugar
1 tsp ground cinnamon


Divide dough in half. Cut a sheet of parchment paper that will fit into a 15.5 x 10.5 x 1 inch baking sheet with some overlap. On the paper, roll one half of the dough into a rectangle, about 15 x 10 inches. The dough is quite soft and fragile, but mends easily. Add flour to the surface as needed to prevent sticking. Lift the parchment paper and dough and place into the baking pan. 


Sprinkle the granola over the pastry in the pan, leaving about 1/2 inch free around the edges. Top with the apple slices. Combine the sugar and cinnamon and sprinkle over the apples. 


Roll the remaining pastry and place over the apples. Seal the edges. Cut small slits in the top of the pastry. Beat the egg white until frothy, brush over the pastry top. Bake at 375 degrees for 50 minutes. The pastry will be golden brown and the apples tender.


Glaze:
1 cup icing (powdered) sugar
3-4 teaspoons milk
1/2 teaspoon vanilla extract


While the pastry is still warm, drizzle the glaze over top. 


Friday, October 14, 2011

Eggplant and Kale Bake


Wow, I've been away from this blog for quite awhile. It's not that I haven't been cooking! 

This recipe is a little of this and a little of that, making it up as I went along. But the result was really good - a meatless entrée that filled our tummies with satisfying goodness. Rich tomato sauce, eggplant slices with a bit of kale from the garden and cheese in between, topped with a little more cheese - who needs meat? 

There are a few steps to this recipe, especially if you make your own tomato sauce, which I did. I won't give you a recipe for that, I'm sure everyone has their favorite. It should be a nice thick chunky sauce, whether you buy it in a jar or cook it up yourself and fill the kitchen with delectable fragrance. But the recipe can be made ahead, and even frozen for future baking.

Eggplant and Kale Bake

1 large eggplant, washed, sliced crosswise in 1/2 inch slices
olive oil
salt, pepper
2 cups of washed, coarsely chopped kale (Spinach or Swiss chard would also work)
2-3 cups of thick tomato sauce
1 cup fresh cheese (ricotta) I used a fresh cheese from Little Qualicum Cheeseworks, just down the road)
1 egg
1/2 cup freshly grated Parmesan cheese
1 tsp dried oregano
1 tsp dried basil
1 cup grated Monterey Jack cheese (or Fontina)

Brush both sides of the eggplant slices with olive oil. Place them in a single layer on an oiled baking sheet. Sprinkle with salt and pepper. Bake at 400 degrees until tender, turning them over once. This will take 20-30 minutes in total.

Bring a pot of salted water to a boil. Drop in the kale and simmer for 10-15 minutes until tender. Drain well. Cool. Press out any remaining water.

Combine the fresh cheese, kale, egg, Parmesan cheese, oregano and basil until well mixed.

In an 8 inch square baking pan, spread 1/2 cup tomato sauce. Place slices of eggplant over to cover. Top with 1/2 of the kale cheese mixture. Spoon 1/2 - 3/4 cup of the tomato sauce over. Repeat layers. Top with a final layer of eggplant slices and the remaining tomato sauce. Sprinkle with the grated Monterey Jack cheese.

Bake at 350 degrees for 30 minutes or until bubbly and hot throughout.

Makes four generous servings.  

Thursday, August 25, 2011

Squash and Green Beans


Faced with an abundance of crookneck squash, I came up with this recipe that includes a few green beans, red onion, and a balsamic vinegar and fresh basil finish. It's mellow and goes with almost anything.

Squash and Green Beans

1 medium crookneck squash, seeded and cut into bite-sized pieces
1-2 cups green beans, tipped and cut into 1-inch lengths
1/4 of a large red onion
1 Tablespoon olive oil
1/2 cup chicken broth (or water)
1-2 Tablespoons balsamic vinegar
1/4 cup sliced fresh basil leaves
salt and pepper to taste

Heat the olive oil in a skillet and sauté the onions for about 1 minute. Add the squash and green beans. Continue sautéeing for 1-2 minutes. Add the chicken broth, cover and simmer 5-10 minutes or until tender crisp. Uncover the skillet and let the mixture simmer until almost all of the liquid is gone. Add the balsamic vinegar, season to taste. Just before serving, sprinkle with fresh basil.


Blueberry Clafoutis


In the past I've made cherry clafoutis, and peach clafoutis. Tonight I thought a blueberry clafoutis sounded good. And it was. I used basically the same recipe as for the cherry clafoutis, with slight alterations.

Blueberry Clafoutis

2 cups washed blueberries
1/4 cup sugar
2 eggs, separated
1 teaspoon vanilla
1/2 teaspoon ground cinnamon
2 Tablespoons all-purpose flour
1 teaspoon lemon zest
1/3 cup cream
pinch of salt
cinnamon sugar to sprinkle on top

Preheat the oven to 350 degrees. Lightly butter a 9 or 10 inch round baking dish. Place the blueberries in the bottom of the dish.

Beat together the egg yolks and sugar until creamy and light-coloured. Beat in the flour, vanilla, lemon zest, cinnamon and cream. Beat the egg whites with a pinch of salt until they form soft peaks. Gently fold the whites into the yolk mixture.

Pour the batter over the blueberries. It will be thin. Bake for 20 minutes or until golden brown. Sprinkle cinnamon sugar, or icing sugar over top. Serve warm.


Friday, July 8, 2011

Avocado Strawberry Salad


Fresh strawberries are one of summer's joys. Inspired by my daughter, I came up with this salad. Her version has lime juice and cilantro, which would be equally delicious, but I had no limes in the house, and the man I love and cook for detests cilantro. 


Avocado Strawberry Salad

fresh strawberries, washed, hulled and sliced if large
avocado, peeled, pitted and cut into chunks
candied ginger, finely chopped ( I used 2 teaspoons of this to one avocado)
freshly chopped parsley

Combine all and gently toss with raspberry vinaigrette. (Mine has a hint of mustard in it.) Serve over lettuce, or on its own. Simple, and oh, so delicious.


Linking to Foodie Friday at Designs by Gollum

Thursday, June 2, 2011

Roasted Cauliflower with Raisins and Capers


I found this recipe in the French Women Don't Get Fat Cookbook about 2 weeks ago and have made it twice already. Mellow cauliflower, a little sweet, a little salt and a bit of crunch add up to something that tickles the taste buds in a very satisfying way. It's good hot or at room temperature. I've altered the recipe slightly, cutting down on the olive oil, and substituting sunflower seeds for the pine nuts.

1/3 cup raisins 
2 Tablespoons red wine vinegar
1 large head cauliflower, trimmed and cut into small florets
3 Tablespoons olive oil
salt and freshly ground black pepper
1 Tablespoon capers, drained and slightly chopped (or leave whole)
3 Tablespoons roasted, unsalted sunflower seeds (or pine nuts)
1 Tablespoon finely chopped parsley

Preheat the oven to 400 degrees.

Combine the raisins and vinegar in a small bowl and allow the raisins to plump for about 30 minutes. 

Place the cauliflower florets on a baking sheet and drizzle with about 2 Tablespoons of the olive oil. Season to taste and roast in the oven for 25 minutes, turning occasionally. It may not take this long - watch for browning.

In a medium bowl, combine the raisins, along with the vinegar, capers, sunflower seeds and remaining olive oil. Season lightly.

Remove the baking sheet from the oven and pour the raisin-caper mixture over the cauliflower, tossing gently. Return the baking sheet to the oven and continue roasting for an additional 15 minutes or until the cauliflower is tender and caramelized. Remove from the oven, place in a bowl and sprinkle with parsley. 


Monday, May 30, 2011

Nut Crusted Little Qualicum Brie Cheese Salad


I've made this salad quite often for a number of years and don't even know where the inspiration for it came from. It's simple and tastes so good, the creamy cheese melting against the crunchy nuts with a slight buttery taste offset by the crisp greens. Really, there's little to improve on.

As far as a recipe goes, it's very loose: 

Set out three small bowls. In one place a couple of tablespoons of flour, in another one beaten egg, and in the third, some chopped nuts. These could be almonds (as above), pecans or walnuts. Hazelnuts might be good, too. 

Cut the Brie cheese into wedges, not too thick. The last time I served this I used thicker wedges and I think I prefer the thinner ones - the ratio of crust to cheese is better.

Coat the wedges with flour, then egg, then nuts. I use one hand for the flour, the other for the eggs and nuts. It's a little messy, but the end result is well worth the effort. Place the wedges on a plate and chill them, if you like, up to 4 or 5 hours. They can also be cooked immediately, but it's nice to do this ahead. 

Melt a little butter in a small skillet and when it's hot, almost browning, add the cheese wedges. Quickly sauté them on each side. They should sizzle a little and the cheese will begin to ooze. Place them on a plate of greens that has been drizzled with your choice of salad dressing - raspberry vinaigrette is good. And, if it's berry season, add some raspberries, blueberries, or strawberries to the salad. But really, this salad is all about the cheese.

Saturday, May 28, 2011

Strawberry Squares


I try new recipes all the time. Some I make more than once, like this one. Dorothy gave me this recipe about 30 years ago. She's the wife of the physician who delivered our eldest daughter in a small jungle hospital in South America.  I remember first eating this - it was so deliciously cool and frosty - perfect for a hot and humid climate. 

I've made this recipe more times than I can count. I like having it in the freezer during the summer - to me, it's better than ice cream! 

Strawberry Squares

1 1/4 cups all-purpose flour
1/2 cup butter
1/3 cup sugar
1/2 cup walnuts or pecans (optional)

Crumble the above ingredients all together, using your hands or a food processor. Place in a 9 x 13 inch glass pan. I just put all the ingredients in the pan and mix it there. Bake at 350 degrees for 20 minutes, stirring once or twice. Let cool completely. Take out about 1/3 of the crumbs to use for a topping, and ensure that the remaining crumbs are scattered evenly over the pan bottom. Set aside while you make the filling.

2 egg whites
1/2 cup sugar
1 1/2 cups partially frozen strawberries (or raspberries)
2 teaspoons lemon juice
1 cup whipping cream

In a large mixing bowl, place the egg whites, sugar, strawberries (with any juice) and lemon juice. Beat at high speed for 10 minutes. You will have a bowl full of lovely strawberry meringue. This can splatter so take precautions.

Whip the cream in a separate bowl until stiff. Fold cream into the strawberry mixture. Turn into glass pan, on top of crumbs. Smooth the top, sprinkle on reserved crumbs. Freeze for at least 6 hours. Cut into squares to serve. 

Friday, May 20, 2011

Mexican Chopped Salad


Now that summer is coming - and we ate outside for the first time this year - I'm looking for more salad recipes. This recipe is one of my favorites - lots of vegetables, lots of flavor. And if someone doesn't like tomatoes, they are easy enough to ignore. The dressing is citrusy and just barely sweet - a perfect balance. I've slightly adapted the recipe from one found in Fine Cooking magazine.

Mexican Chopped Salad

Dressing:
1 small clove garlic
kosher salt
3 T fresh lime juice
3 T fresh orange juice
2 tsp finely chopped shallot
1 T honey
1/2 tsp ground cumin
1/4 cup olive oil
freshly ground black pepper

Mince and mash the garlic with 1/4 tsp salt to a paste. Whisk garlic paste with orange and lime juices, shallot, honey and ground cumin. Slowly whisk in the oil. Season to taste with pepper and a bit more salt, if needed. Set aside.


Vegetables:
corn (I used frozen and thawed)
black beans (rinsed, if using canned, and drained)
tomatoes, cored and chopped
sweet red pepper, diced (or use roasted red peppers)
avocado, diced


chopped cilantro or parsley


On a platter, arrange mounds of corn (I use frozen and thawed), black beans (rinsed and drained), chopped tomatoes, diced red bell pepper (I sometimes do these roasted), and diced avocado. Drizzle with the dressing and sprinkle with chopped cilantro, or chopped parsley if cilantro isn't in your list of things to enjoy. (like some of my family members)


Mixing a finely chopped jalapeno pepper with the black beans would kick up the flavor a little. But if you serve this with already spicy foods, the salad is a cool contrast.

Sunday, April 10, 2011

Almond Apricot Bars


There's always a little sweet in our house. This one is buttery, not too sweet, with a jammy centre that tastes of summer. It can be glazed with some icing sugar and milk, but I prefer it plain. That crumbly topping - my favorite.


I found a recipe several years ago on the Land o' Lakes site, called Almond Strawberry Bars. I've adapted it considerably and am pleased with the results.


1 1/4 cups flour (All-purpose flour is fine, but I like a combination, about 1/2 cup whole wheat flour and 3/4 cup white, all-purpose flour)
1/2 cup butter, at room temperature
1/4 cup brown sugar, not too firmly packed


3/4 cup apricot jam (or any flavor of jam - thus, the name is flexible)


2 Tablespoons butter (in addition to the 1/2 cup)
2 Tablespoons brown sugar (in addition to the 1/4 cup)
1/2 teaspoon almond extract
1/2 cup sliced almonds


Heat oven to 350 degrees. 


In mixer or food processor, combine the flour, and first amount of butter and brown sugar. Pulse until crumbly, but will cling together when pressed. 


Remove 2/3 cup of the mixture and press the remainder into the bottom of a 9 inch square glass pan. Bake for 15 to 20 minutes or until the edges are lightly browned.


While hot, spread the jam over top. 


Combine the reserved crust mixture with the additional butter and brown sugar, the almond extract and the sliced almonds. Sprinkle over top of jam.


Return to oven and continue baking for 20 to 25 minutes or until the edges are lightly browned. Cool completely, then cut into small squares to serve.


I realized while typing this that I neglected to add the almonds to the crumb mixture. So they don't show in the picture. Sigh. Everything's better with almonds.


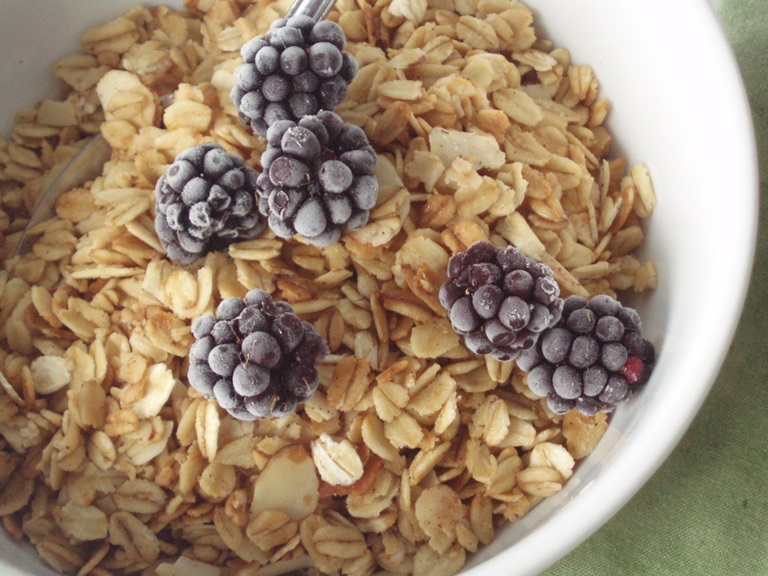
Crunchy Granola


My husband's go-to breakfast is a bowl of granola topped with a few blackberries. We pick them in late summer and freeze bags of them for winter. Sometimes he thaws them out a little in the microwave, most often he eats them frozen. They thaw quickly when milk is poured on them.


Granola is something I've always made. I've gone through several recipes, this is the latest rendition. It's simple, has minimal ingredients, but the add-ins are limited only by your taste.


Crunchy Granola


9 cups whole oats (I use wild oats when I can find them) (rolled oats work as well - they just don't have the same "chew" factor)
2/3 to 3/4 cup honey or maple syrup
2/3 cup melted butter, or a combination of butter/margarine and canola oil (I use a combination - using about half butter gives a wonderful taste and contributes to the crunch factor)
1 cup sliced almonds
1 1/2 teaspoons ground cinnamon


Preheat the oven to 350 degrees.


Stir together the oats, nuts and cinnamon in a large, ungreased baking pan. I use a 10 x 15 Pyrex baking dish. A rimmed baking sheet would work as well.


Melt the butter, add the honey and oil, and heat until liquid. Pour over the oats and stir to combine thoroughly.


Bake at 350 degrees 40 minutes, stirring every 10 minutes. When cool, add in extras, if desired.


Serve with milk or yogurt, or applesauce. Top with berries


Add-ins:
coconut, dried cranberries, raisins, dates, apricots, sunflower or pumpkin seeds

Wednesday, February 16, 2011

Crousillants (Cheese Crackers)


As guests arrive for dinner, I like to serve a few nibbles to begin an evening of conviviality. A dish of olives and a plate of these crisp cheese crackers is easy and appeals to almost anyone. 


This recipe is taken from the Williams Sonoma Paris book, given to me by Tim who brought it home from San Francisco business trip. The dough can be made ahead and frozen, then baked early in the day. They are addictive little things - consider yourself forewarned.


2 cups shredded Comté or Gruyère cheese
1/2 cup grated Parmesan cheese
6 Tablespoons butter
1 cup all-purpose flour
pinch of cayenne pepper
2-3 Tablespoons chopped fresh chives*
coarse sea salt


In a food processor, combine the Comté, Parmesan, butter, flour and cayenne. Process until combined and crumbly, 40-60 seconds.


Transfer the mixture to a cool surface and pat into a log about 2 inches in diameter. You don't have to be particularly gentle with this dough. Wrap it in plastic wrap and chill for at least one hour. Or freeze for longer storage.


Preheat the oven to 350 degrees. Unwrap dough and slice into rounds about 1/4 inch thick. Arrange on parchment paper lined baking sheets, about 1 inch apart. Sprinkle with the chives, then about 1 teaspoon sea salt. 


Bake the crackers until they are a light, golden brown, 10 -15 minutes, taking care to not let them get too dark. If the edges brown too much the crackers will taste bitter. 


Remove from the oven and serve to your delighted guests.

*Should you find yourself without fresh chives, a little dried or fresh thyme is a good substitute. 

Sunday, January 9, 2011

Eggplant Mushroom Stacks


Eggplant is one vegetable I never tasted until well into adulthood. But since discovering it I appreciate its versatility. And fortunately my family has adventurous taste buds and will try just about anything. 


These are easy to put together, add character to a plate, and have a mellow, warm taste that fit today's snowy weather. I think the parsley, or another fresh herb, is indispensable to the dish, adding a fresh element to the mellow flavors. My husband might disagree a little, but he doesn't complain.


Eggplant Mushroom Stacks


1 medium eggplant, washed, ends trimmed, and cut into 1/2-3/4 inch slices
olive oil
salt and pepper
1-1/2 cups thickly sliced mushrooms
2 Tablespoons butter
2 green onions, sliced
2 Tablespoons white wine or chicken broth
1 teaspoon Dijon mustard
1/4 cup freshly grated Parmesan cheese
2 Tablespoons chopped parsley


Preheat oven to 400 degrees. Brush olive oil on both sides of the eggplant slices. Place them on a rimmed baking sheet in a single layer. Sprinkle the tops with salt and pepper. Bake eggplant for 10 - 15 minutes on one side, then flip over and continue baking another 10 - 15 minutes until very tender. 


While the eggplant bakes, melt the butter and 2 Tablespoons olive oil in a skillet. Heat to medium high and add the mushrooms. Let them cook without stirring for 1-2 minutes so that they brown a bit. Add the green onions, stir and continue sautéing until the mushrooms have released their liquid. 


Push the mushrooms to one side of the pan and add the white wine or chicken broth and mustard. Whisk vigorously, combining the wine and mustard, scraping up any bits from the bottom of the skillet. Then stir the mushrooms into the liquid and cook over high heat until most of the liquid is evaporated.


When the eggplant is baked, pile the mushrooms onto each slice. Sprinkle with Parmesan cheese and return to the oven for about 5 minutes. Place on a serving platter and toss parsley over.

Wednesday, January 5, 2011

Thyme Pork Chops with Mustard Sauce


After Christmas feasting followed by New Year's feasting, yesterday felt like a good day to have something homey for dinner. These pork chops were tender and moist and tasted so good with the bok choy. Thyme is my favorite winter herb. I think it has a warm earthy flavor that suits rainy, windy weather.


This is a fast recipe - easily done in less than 30 minutes. I served it alongside roasted sweet potato wedges and garlicky green beans with tomatoes. Lots of vegetables - just what I love.


I cooked this recipe in one pan, keeping the greens hot until the chops were done. Two frying pans could also be used, but then you have two pans to wash. 


Thyme Pork Chops with Mustard Sauce


3 thick boneless pork chops
dried thyme, salt and pepper
2-3 Tablespoons olive oil
1/2 medium onion, slivered
3 baby bok choy, sliced
1/4 cup white wine
1/2 cup chicken stock
1 Tablespoon Dijon mustard (peppercorn would be delicious)
2 Tablespoons cream (optional)


Heat 1 Tablespoon olive oil in skillet. Add slivered onions and sauté until tender crisp. Add the sliced bok choy and continue sautéing until onions are tender and bok choy is tender crisp - between 5 and 10 minutes. Remove the vegetables to a serving platter and keep warm.


Add 1-2 Tablespoons olive oil to skillet. Heat to medium. Sprinkle both sides of pork chops with dried thyme, salt and pepper. Place in skillet, cook until done, turning once, about 10 minutes. Place chops on top of onions and bok choy. Keep warm.


Deglaze the skillet with white wine, stirring up all the caramelized bits from the bottom of the pan. Whisk in the mustard and add the chicken broth. Reduce the liquid by about one half. Whisk in cream, if desired. Pour sauce over chops.